Adobe Illustrator How to Convert Text to Outlines
When using Adobe Illustrator how to (and when to) convert text to outlines for press-ready vector artwork is essential knowledge. Fonts can cause problems when sending artwork to press. If you've used a typeface that your printing house doesn't have, the document will print incorrectly. This is why you'll find that fonts within most vector logos (containing text) will have been converted to outlines, or paths. This effectively means that the text is no longer text - it has become a graphic, and the text cannot be altered.
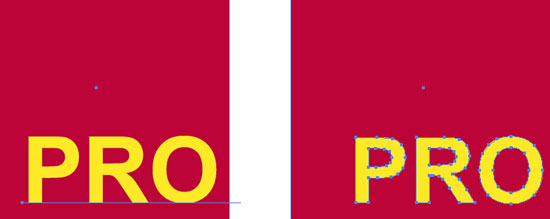
Converting text to outlines is very easy in Illustrator. The "PRO" text in the graphic shown below (left) has a blue line underneath it. This shows that the text is made up of a typeface, not a graphic. The little blue square at the left end of the line indicates that the text is ranged left. If the type were centred, the little square would be in the middle of the line.
It's good practice to keep an editable copy of your document as an AI file before you convert text to outlines and save the file as an Illustrator EPS file. This is so that you can come back and edit it non-destructively later, instead of having to recreate the artwork with text again.
To convert text to outlines, go Select > Select All. It doesn't matter if other graphic elements are selected. Select Type > Create Outlines from the menu. The text will become outlined and can't be edited as text (see the image below right). Now, as you can see, the line beneath the text has gone. The text characters now have editable paths, or outlines, around them - they are no longer text, but vector graphics, and can be edited as such.

Resources & More Information
- Illustrator Tutorials
- If you want to know more about working with Adobe Illustrator files, visit: Adobe Illustrator How to Prepare a Vector Image for Press
- Return from Adobe Illustrator How to Convert Text to Outlines to Home
