Setting up InDesign Files: Business Card Layout Design and PDFX1a Creation
This is a simple exercise to demonstrate how to produce press-ready Adobe InDesign files by creating a basic business card layout design and preparing it for press. We'll create both spot color and 4 color process versions. The logo I'm using for this exercise is one that I put together in Illustrator (see the Create Vector Logo exercise) to demonstrate how to create both spot color and four color process vector graphic files.
The purpose of this website is to demonstrate essential skills which are required for your first graphic design job - I'm going to assume that you already have a some background training and a good eye for design. If you'd like to know about the basics of how to design and design theory, there are some excellent websites and books at your disposal.
Creating Spot Color Documents - Business Card Layout Design
The principles of setting up a layout document correctly are universal (whether you create InDesign files or Quark files). Using InDesign, create a new document. Most business cards tend to be 85mm x 55mm in size (or 90mm x 55mm). We'll focus on the former. We're going to set this document up with bleed, which means that the elements on the page will 'bleed off' onto the paste board. The final artwork will require crop marks to guide the print finisher where to cut it out.
Usually at least 3mm bleed is required for most documents. I always play it safe and set the file up with 5mm bleed. When you create new InDesign files you'll be presented with a new document dialogue box (see below). Don't worry about the 'slug' setting - this dictates where additional textual information is shown within the printer's registration marks - it's not essential information for now.
You view the bleed and slug settings by clicking the 'more options' button on the right (which becomes a 'fewer options' button after being pressed). Just enter a 5mm margin all the way around. This would be larger for a bigger document, and if it proves to be too small it can be altered later.

Our card will be 'landscape' in aspect. Select 'portrait' if you prefer.
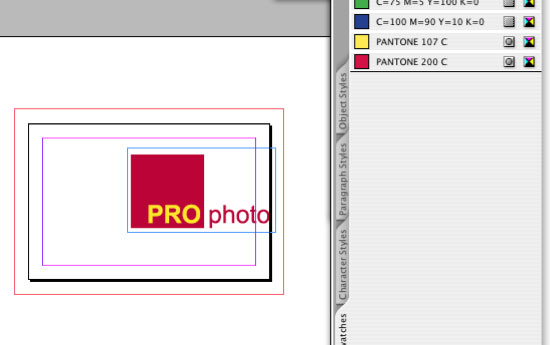
You'll be presented with a document as shown below. The black outline indicates the edge of the document itself - 85mm wide by 55mm high. The inner pink border is the 5mm margin, and the outer red border is the 5mm bleed. Save the document as PROphoto_BusinessCard.indd.
When saving InDesign files (or any file for that matter), notice that I use underscores instead of spaces in file names. This is a hangover from years of worrying about PC compatibility, so I still do it - you can have spaces if you want. As with all files I save, best practice is to keep the file name short but clear just in case you need to search through the archives for it in years to come.

Import a Logo or Vector Graphic
The first thing I'm going to do is to import the logo which I created in Illustrator. I'll import the two color version as this is a spot color job. If you watch your swatches palette when you import the file (File/Place...) you'll notice that after the import has taken place the spot color swatches associated with this file are imported along with it. These are the swatches you should use for the other elements of the design.
After importing a vector graphic you'll probably find that it doesn't look too good on screen. If you want a more accurate depiction of what you're looking at, go View/Display Performance/High Quality Display to improve the quality of the items on screen (at the expense of working speed).
In the swatches palette you'll see a little grey box to the right of the color squares. If they have a little circle inside them, they are spot colors. The others are process colors.
Business Card Layout Design
This is where what knowledge you have of design comes into play - use the toolbar to create text and areas of colour to design your card. Alternatively, you can simply copy the simple design I have created below. Just remember to only use the two spot colors in your palette. You can use tints of them if you wish by filling an area or element of text with, say, the Pantone 200 red, and then opening your Color palette and moving the tint slider up or down as required. I usually keep to round number percentages (25%, 50%, 75%) for no better reason than I like things nice and ordered. Don't go below 5-10% (depending on the color hue) because it might disappear altogether.
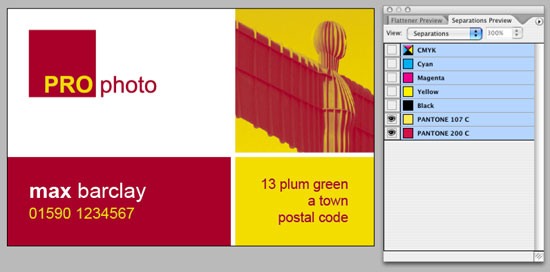
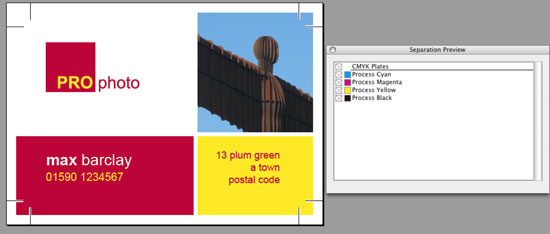
My effort is shown below. No masterpiece, but this exercise isn't about great design - it's about creating InDesign files and preparing them for press - and all the principles shown here apply to most projects you'll work on. Set up the documents correctly at the start and you'll save yourself time and money later. On my card I've used white text - this adds variety and doesn't constitute an additional color - the white areas will be the color of whatever paper stock is used. They are simply clear areas which have been untouched by ink. I've also brought in a grayscale photo which has had the two colors applied to it using both the Selection tool and Direct Selection tool. We end up with a two color card which seems to have more colors because of the the variety of content and gradients.
When working with InDesign files, when you hit the 'W' (when no text is selected) the view will toggle between 'Normal' mode and 'Preview' mode. Preview mode will hide all guides and crop in to the edges of the document so you can get a great idea of how the final result will look.
If you open the Separations Preview palette (Window/Output/Separations Preview) and select 'Separations' from the popup view menu, you can turn the plates on and off to ensure that you have only used two colors. The two spot colors will appear at the bottom. Turn these two off, leave the CMYK colors on and see if any of your artwork remains visible. If it does, you've used some process colors by mistake and must change them to spot colors.
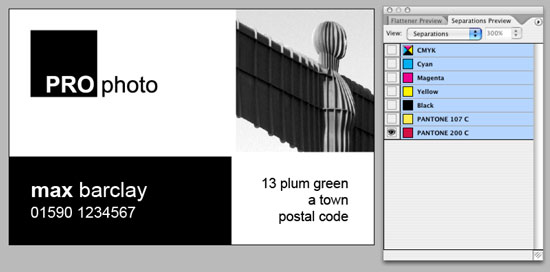
If you leave just one of the spot color plates visible (by clicking the little eye to the left of the swatch) the artwork will turn black. This is because all color plates are actually the same monochromatic color - it's only when the ink is applied to the rollers that the decision is made to use the spot color of your choice. This prepress check should be made in InDesign files as well as Acrobat files before sending artwork to the printer.
Never forget about this human intervention at the printing stage - if you're working in a digital world day after day it's easy to forget that the printing environment is much more 'hands-on' than that of a design studio. The people who work on the production floor of a printing house are the ones that work with the machines which ultimately determine how the final result looks. Give them as much help as possible to do a good job - give them unblemished artwork and unambiguous instructions, and things should go fine!
So now we're happy, the card's been signed off by the client - let's make the InDesign files press-ready! We used to 'Collect for Output' (Quark files) or 'Package' (InDesign files), which meant that Quark and InDesign files were sent to press along with all images and fonts. Nowadays, unless otherwise specified, everything goes to press as a PDF file.
Before, the printer could correct trapping or even the odd emergency typo (if requred). This (in our studio) is rarely the case now. Instead of sending InDesign files, we export press-ready artwork to an Acrobat PDF format (Portable Document Format). The press-ready PDF is the ultimate 'what you see is what you get' document. It is unalterable by the printer, so make sure it's correct with some more prepress checks.
Exporting InDesign to Adobe Acrobat as PDFX1a Fomat
The format we use for 99.9% of all press-ready PDF files is PDF/X-1a, whether it is output from Quark XPress (using Acrobat Distiller) or from InDesign files. In InDesign CS2, select File/Adobe PDF Presets/[PDF/X-1a:2001]...
I won't go into the whys and wherefores of PDFX1a - it's just important that you know to use this format instead of the others - it's more universally acceptable to more publications and printers, and in my experience causes fewer problems (although nothing is completely free of issues...). The PDF file size produced is marvellously small (in comparison to a Package option) and of excellent quality.
For small jobs like this you can use it to create proofs for the client as well (instead of a 'smallest file size' option). InDesign files have an advantage over Quark 6 files in that they can export directly to the correct format rather than going through a lengthy Print Style setup and Acrobat Distiller conversion.
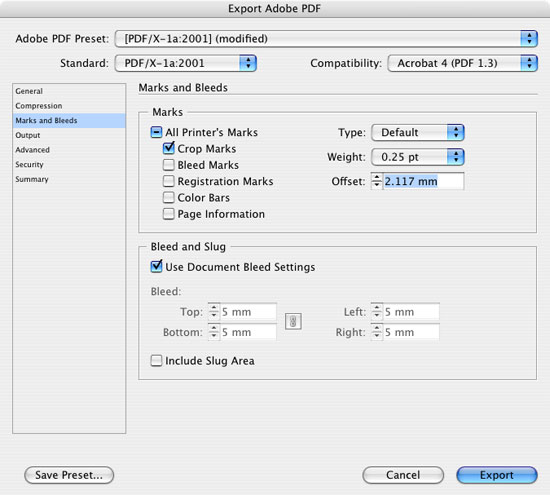
After selecting the PDF/X-1a option, you'll get the opportunity to give the PDF file a name and destination - and then you'll see a dialogue box appear. The only settings that concern you are the bleed and registration settings. We won't be outputting spreads - we only tend to do that when creating a four page document (anything bigger should be output as single pages). If this were a double sided business card there would be two single pages to output - each side on a different page in the same PDF document.
Over on the left, click 'Marks and Bleed'. Check the 'Crop Marks' box (you can check all the Printers Marks if you like - but it's not essential - if in doubt, do so). Under Bleed and Slug, check the 'Use Document Bleed Settings' box. Because we set up the document with 5mm bleed, the value fields will gray out showing 5mm in each one. If we set the document up with no bleed but required it, we'd enter 5mm in each field manually. If no bleed were required (for example of the document were a bordered display advert which didn't bleed off the page), we'd leave the bleed values empty.
Final Prepress Checks
Open the resulting document and double check everything as follows:
- Print the card out from Acrobat (at 100% size, not scaled up or down) and cut it out using the crop marks as a guide. You should cut through the bleed area, leaving you with a card 85mm x 55mm with color going right to the edge.
- Open the Separation Preview window and make sure the two spot swatches are present. Turn off the swatches (as you did earlier in InDesign) and ensure that no process colors have crept in.
- Take a step back - look at the text and layout - is it all exactly as had been signed off? No changes?
- Email it to the printer! Let the printer know what spot colors you have used, what stock you want it printed on and in what quantity. It's funny how these simple details get forgotten so close to the finish post!
Creating 4 Color Process InDesign Files - Business Card Layout Design
Let's say the client want a full color image on the card instead of the two color version. There are two ways to do this - the expensive (and better quality) way would be to print the full color areas first and then overprint the spot colors. It's easy enough to set the colors up in InDesign files, but good luck finding too many clients who want to go to this expense!
The second (and more usual) route is to convert everything to four color process and let the printer know that they should match the areas of red and yellow as closely as possible to their original Pantone reference numbers.
You can either start from scratch by importing the CMYK version of the logo created in the Illustrator exercise into new InDesign files, or you can leave everything in place, adjust the swatches and place the full color image in place of the grayscale version.
Let's do the latter! If you want to keep a copy of the spot color version, save the two InDesign files separately. Once you have save the InDesign files with appropriate names, opent the process version, double click one of the spot color swatches and change the Color Type popup menu option from Spot to Process. Click OK. That's it!
Do the same with the other Pantone color and you'll notice that the little circles (spots) have disappeared from within the gray boxes in the swatches palette. If you examine the Separations Preview palette you'll see that the spot colors have gone. The document is now ready to export as a four color process file - but we want to bring in the full color image first.
If the image is exactly the same physical size and resolution as the existing grayscale version, you can just click on the one that's there, go File/Place... and select the replacement. It will inherit the exact scale and position properties of the current image. Job done! This is just one area where InDesign files are a joy to work on - in Quark you'd have to make a note of the x/y axis image position, and the percentage scale, and then place, re-scale and reposition the image. InDesign files just take care of it for you.
Export the PDF file in exactly the same way, and this time (when performing pre-press checks with the Separations Preview palette) make sure that none of the spot colors have crept into the final artwork. Below is the document opened in Acrobat.
Use These Techniques for All InDesign and Quark XPress Files
It doesn't matter if you're creating a business card or a 32 page brochure. The principles are the same for both InDesign files and Quark files. Spend time setting up the document correctly from the very beginning, or waste a lot more time later. Think ahead - how many columns will you need? How many pages? Should the document be set up with facing pages? How will the document be finished and bound? And how will this impact on the margins on the inside of the page?
Think OUTSIDE THE BOX
I really cannot stress this enough. I hate the expression but I always find myself using it!
If you're in the early stages of your career as a graphic designer, you won't know everything - but always avoid using the expression "I didn't know I was supposed to do that" after something has gone wrong. This may be true, but it effectively shifts the blame onto your boss, and trust me - he or she won't like it. If you didn't know what you were doing, it means that they were at fault by not training you properly. Don't put them in this position.
Your graphic design employer will be understanding if you barrage them with a bucket full of questions about exactly what you should do and when, as long as you remember their answers. They'll be less understanding if you say nothing, send something to press containing mistakes and then claim it wasn't your fault.
You'll make mistakes - everyone does. It's how you learn from them that makes you a good employee and a potentially great graphic designer.