How to Create a Glassy Button or Enamel Badge Effect in Photoshop
Photoshop Tutorial Glassy Button or Enamel Badge
What are layer styles?
Layer styles are effects built into the layer palette that enable you to work non-destructively. This means that the effects can be turned on and off, leaving the content of the layer unaffected. Layer styles are incredibly versatile, as this tutorial will hopefully demonstrate! The graphic shown below contains just two flat shape layers - all the effects (including the text on the badge) have been applied using Layer Styles.
![]()

So how was it created? You can either read on, or view the Photoshop video tutorial below.
Photoshop Tutorial Glassy Button or Enamel Badge
Photoshop Video Tutorial
Photoshop Tutorial Glassy Button or Enamel Badge
Use shape layers to create the basic shape
Create an RGB Photoshop document 550 pixels wide by 250 pixels high. If you need to create a higher resolution image, adjust the layer style settings below to achieve the desired effect. Fill the background with black.
First we're going to create a shape layer with the Rounded Rectangle Tool. Set the corner radius to 10 pixels and create a rectangle on the canvas. Double click the color swatch on the shape layer and fill it with yellow as shown below. Now select all, and (with the Move Tool selected) in the options palette click the Align Horizontal Centers and Align Vertical Centers buttons to center the shape within the canvas. Now duplicate the layer by dragging it over the Create a New Layer button at the bottom of the layers palette.
![]()

Photoshop Tutorial Glassy Button or Enamel Badge
Create a stroke for the metal effect
Select the lower shape layer (which will become a metal back plate for the button) and click the Add a Layer Style button. Then select Stroke from the popup menu. Make the Size 8 and set the Position to Outside. Select Gradient from the Fill Type menu and then click the default gradient that appears in the window to open the Gradient Editor.
![]()

We're going to create a new metallic gradient, so once the Gradient Editor is open, add three points below the black and white gradient bar and make all the points alternating shades of white and gray. Click OK when you're happy. Back at the Layer Style box, adjust the angle to around -135 degrees. Click OK.
![]()

Photoshop Tutorial Glassy Button or Enamel Badge
Create a badge graphic and define it as a pattern
Next we're going to create some text to place on our badge. Glassy objects created in Photoshop really come to life when the reflections and shadows affect some sort of image or graphic placed on the surface. You could create something in Illustrator and paste it in, or use a photo. However, because we want to create this object using nothing but Layer Styles, we need to define a pattern to place from within the Pattern Overlay layer style.
![]()

To do this, first hide the two rectangle shape layers. Create a new layer immediately above the black background layer and fill it with white. Create some text or graphics to appear on the badge, making sure they fit well within the bounds of the badge rectangle. Now select all. Go to Edit/Define Pattern... Click OK on the preview box that appears. The pattern is now defined and saved, so you can delete the graphic layers and white layer you just created. Turn the two shape layers on again.
Photoshop Tutorial Glassy Button or Enamel Badge
Stroke the upper shape layer
Now select the higher shape layer - this is where the magic happens! Click the Add a Layer Style button and select Stroke. Give it the following settings (if any settings are not mentioned here, it means that they should be left at their default values):
- Size: 2
- Position: Outside
- Blend Mode: Screen
- Opacity: 50
- Color: white
This will create a thin white line where the 'enamel' meets the metal back plate.
![]()

Photoshop Tutorial Glassy Button or Enamel Badge
Use shape layers to create the basic shape
Select Pattern Overlay and give it the following settings:
- Blend Mode: Multiply
- Opacity: 100%
- Scale 100%
Select the new 'pattern' you created from the popup menu. Your graphic should appear in position exactly where you created it. If it's off-center you can move it around to a better position whilst the Pattern Overlay Layer Style dialogue box is still open.
![]()

Photoshop Tutorial Glassy Button or Enamel Badge
Add a subtle gradient
Select Gradient Overlay. Use these values:
- Blend Mode: Multiply
- Opacity: 80%
Then click on the gradient to open the Gradient Editor. Create a gradient with gray blending into white as shown below.
![]()

Photoshop Tutorial Glassy Button or Enamel Badge
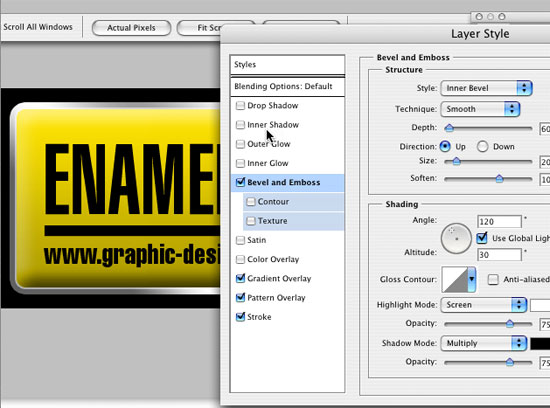
Give it a 3D look
Now we'll start to give the graphic more of a 3D look. Select Bevel and Emboss with these settings:
- Style: Inner Bevel
- Depth 60%
- Direction: Up
- Size: 20 pixels
- Soften: 10 pixels
Photoshop Tutorial Glassy Button or Enamel Badge
Bring in the reflection!
The real juice comes with the Inner Shadow setting - select it now and input these values:
- Blend Mode: Screen
- Color: White
- Opacity: 50%
- Angle: 90 degrees (uncheck 'Use Global Light')
- Distance: 90 pixels
- Choke: 2%
- Size: 0 pixels
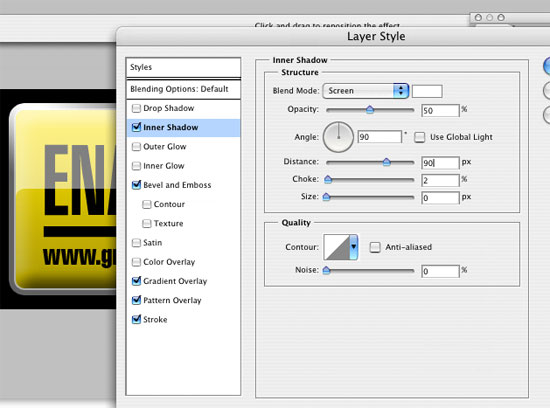
This gives the badge a lovely glassy reflection which even curves down nicely at the edges to enhance the 3D effect. Once you're happy with all the settings, click OK - and we're done!
![]()
Resources & More Information
- Bling Text Tutorial
- Photoshop Clipping Paths
- Free Method of Converting Quark to InDesign
- 4 Color Process Printing and Spot Color Printing - What's the Difference?
- Return from Glassy Button or Enamel Badge Effect to Home