Photoshop Tutorial Bling Text - How to Create Metal Effects in Photoshop Using Adjustment Layers and Layer Effects
Photoshop Tutorial Bling Text
What are adjustment layers?
Some great effects can be achieved in Adobe Photoshop CC by working 'non-destructively'. This means that effects can be added and removed without permanently affecting the pixels shown in the Photoshop document. An adjustment layer can be created in the layers palette of Photoshop and it can contain levels, color adjustment information, brightness & contrast options and so on. Any layer beneath the adjustment layer will be affected by its values. The adjustment layers can be deleted, leaving the layers beneath it untouched and in their original state.
Photoshop Tutorial Bling Text
What are layer effects?
Similarly, layer effects can be added to individual layers which enable special effects such as drop shadows, embossing, color fills and so on. These can also be deleted, leaving the layer unaffected. These effects enable you to work non-destructively, and you should always keep the orginal layered Photoshop document archived in case you need to make changes to it at a later date. When you're happy with your artwork, duplicate the PSD file, flatten the layers and save it as a TIFF, JPEG or whatever is required. When you apply effects by flattening the layers in a document, you are working 'destructively'.
The graphic below was created in Photoshop by creating a flat shape layer and applying adjustment layers and layer effects to it. The only aspect of the image that did not take advantage of these were the sparkles and reflection.
![]()

So how was it done? You can either read on, or choose to view the Photoshop video tutorial below. Apologies for my less than inspiring voiceover! It's surprisingly difficult to inject enthusiasm when you're trying to concentrate on creating the image at the same time - especially at 2 in the morning!
Photoshop Tutorial Bling Text
Photoshop Video Tutorial
Photoshop Tutorial Bling Text
Photoshop Written Tutorial
Create a Photoshop document. Mine was about 190mm square at 300DPI because the end result was destined for press. You can work with a smaller document if you prefer. Keep it RGB for now. If it's for press, convert the final (flattened) result to CMYK when you're finished.
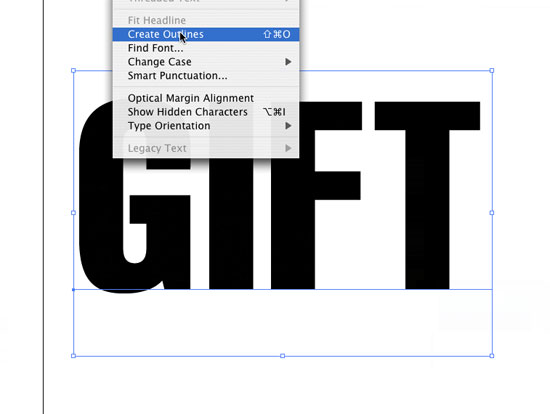
Move to Illustrator where to create your text. A compact, bulky font should do the job nicely, like Helvetica Compressed (which is what I have used here) or Impact. Once you're happy with the look of the text, convert it to outlines by selecting Type/Create Outlines. Then copy the vector graphic and paste it into a Photoshop document (containing a black background) as a Shape Layer.
![]()
Photoshop Tutorial Bling Text
Create a shape layer
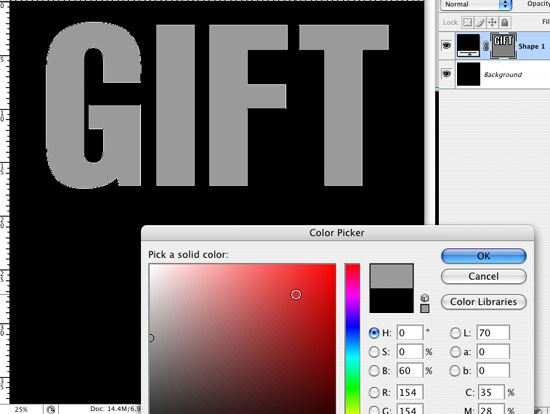
Once in Photoshop, select Edit/Free Transform and scale the new shape layer up to the size and position required (as below). Double click the color swatch in the layers palette to change the color of the shape layer. It doesn't matter too much which color you select because the layer effects will conceal the color attributes later. This is just so that you can see what you're working with. For now, just select gray.
![]()
Photoshop Tutorial Bling Text
Add a stroke, gradient and bevel
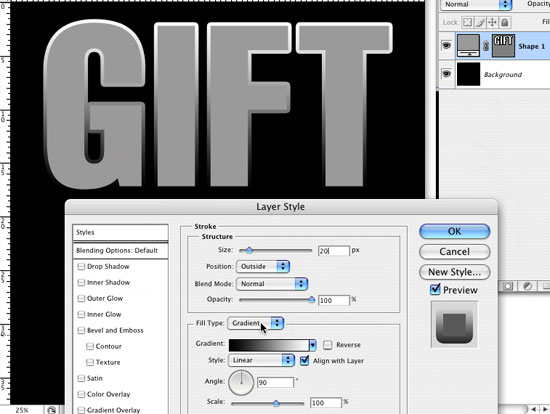
Then click the 'add a layer style' (layer effects) button at the bottom of the layers palette. A submenu will appear. Select Stroke. Change the Fill Type to 'Gradient' and select the default black to white gradient. Make the Size 20 pixels (or whatever size matches the image below).
![]()
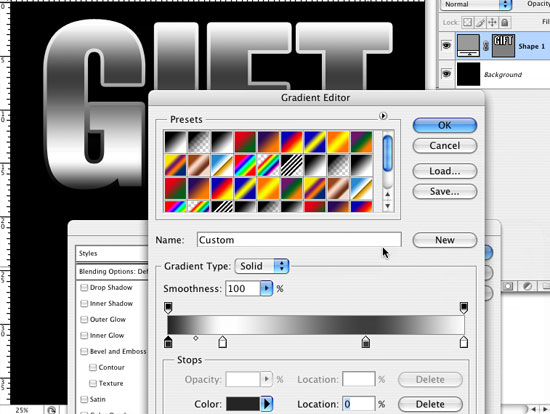
Then check the Gradient Overlay box. Click on the default gradient that appears to open the Gradient Editor. Click a couple of new points onto the gradient (as below), change their colors to grays and whites, and click OK.
![]()
Back at the Layer Style dialogue box, change the Angle to 145 degrees. You're done with this effect. Now select the Bevel and Emboss checkbox.
![]()
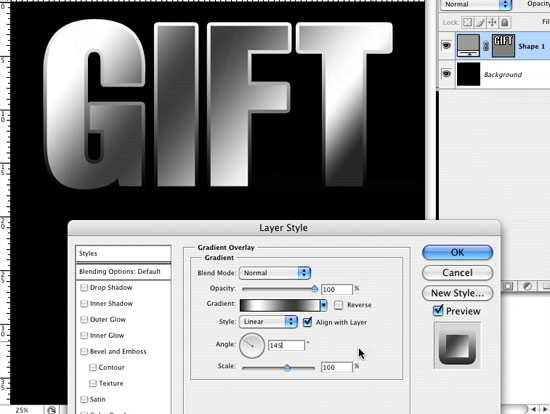
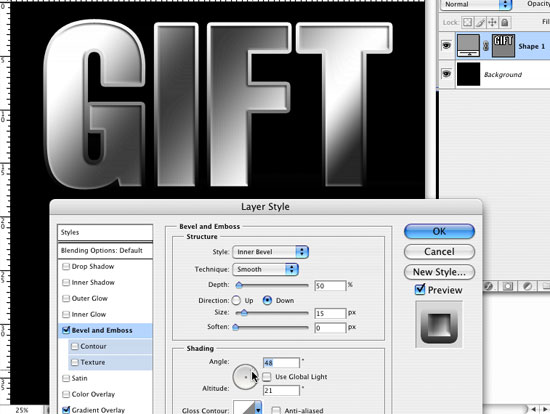
Select Inner Bevel, Depth 50, Direction Down and Size 15. Un-check the 'Use Global Light' checkbox and change the Angle until you're happy with the look of the word. It should end up looking something like this:
![]()
Photoshop Tutorial Bling Text
Adjustment Layers - Create Photoshop Chrome
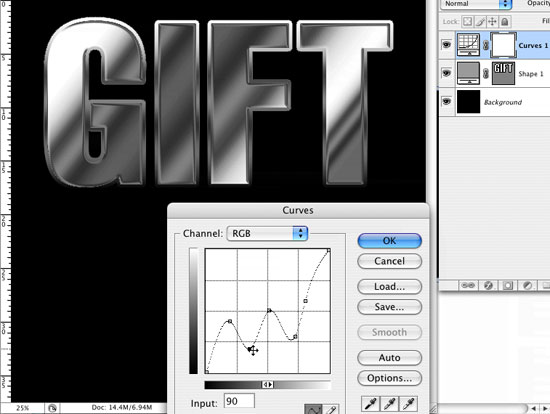
Now we're going the give the word a chrome look using a Curves Adjustment Layer. Click on the 'Create New Fill or Adjustment Layer' button at the bottom of the layers palette. From the popup menu, select Curves. A straight, diagonal line will appear in the dialogue box going from bottom left to top right. Click and drag on the line and a point will appear. Move it up. Then slightly to the right of it, click on the line again. Drag the new point down. Repeat this until the line looks like the one below. You'll see a nice shiny metal effect appear on the word.
Remember, all this is non-destructive so far. If you click the visibility of the Curves adjustment layer on and off, the metal effect will turn on and off with it.
![]()
Photoshop Tutorial Bling Text
Turn chrome to gold
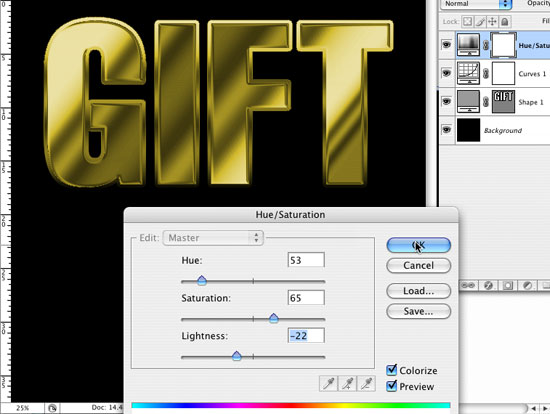
To turn the color to gold, create a new adjustment layer. This one will be a Hue/Saturation layer. Check the colorize box, change the Hue to around 50, Saturation to around 65 and lightness down to -20 or so. Play around with the sliders until you have the color and lightness you want.
![]()
Photoshop Tutorial Bling Text
Create a custom pattern fill
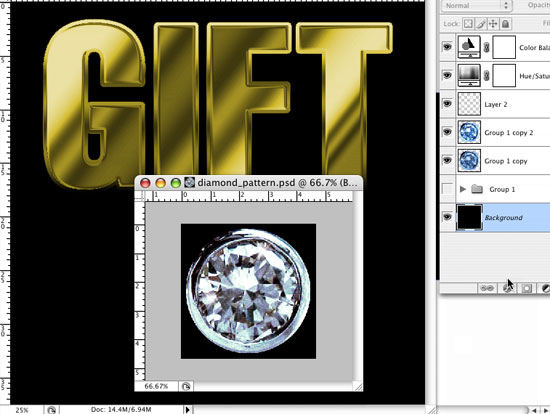
Now we'll add the diamonds! Find a picture of a diamond (or you can use the one shown in the image below). It would be best to use a picture that shows the diamond straight on rather than at an angle. Make sure the diamond is positioned centrally within a square canvas.
If you want a good source of high quality, royalty free (cheap) images, try Dreamstime.com - a good resource for designers.
![]()
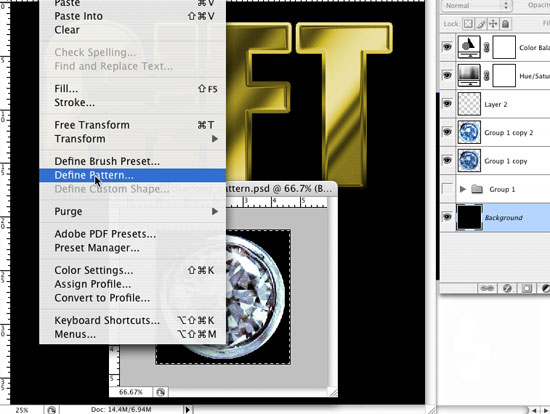
Select all, then go to Edit/Define Pattern... Give the new pattern a name and go OK. You can now close the diamond image.
![]()
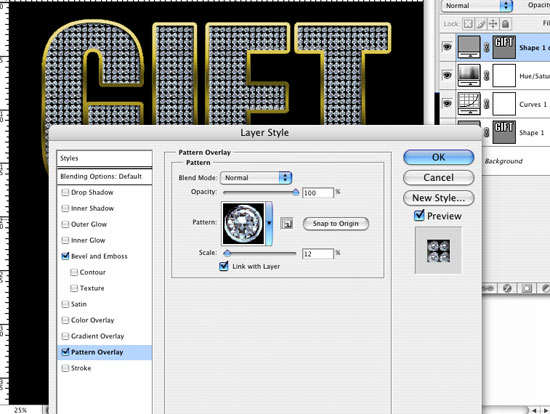
Now duplicate your shape layer and position the new layer above your two adjustment layers as below. Click the Layer Style button and the Layer Style dialogue box will open, showing the checked boxes for the styles already applied to your duplicate layer. Uncheck Stroke and Gradient Overlay. Leave Bevel and Emboss as it is. Select Pattern Overlay. Click on the Pattern icon and select your new diamond icon from the available options. Drag the Scale slider down until you're happy with the size of the diamond pattern within your word.
![]()
Photoshop Tutorial Bling Text
Create a soft spotlight
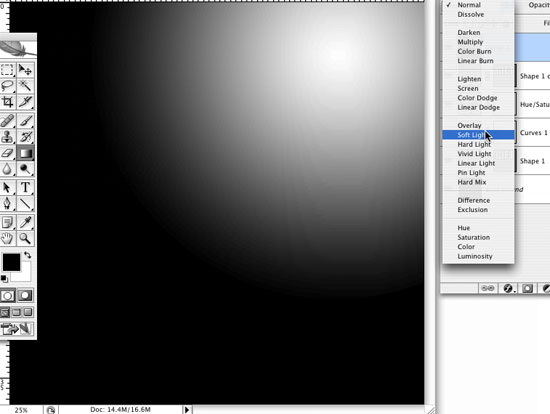
We're very nearly there now. In order to add a little more depth to the image, we can create a spotlight effect by creating a new layer, adding a radial black and white gradient to it (as below) and then changing the Blend Mode for the layer to 'Soft Light'. This adds a little depth to the graphic. For additional effect, click the Add Layer Mask button at the bottom of the layers palette. With the mask selected, you can erase (using an airbrush with 50% opacity) in diagonals to add realism to the shadow. Play around with it until you're happy.
![]()
Photoshop Tutorial Bling Text
Create sparkly bits
Now create a new layer in which we'll add some sparkles. Select a cross-hair brush from the Photohop Brushes palette (you may need to load additional brushes to find it). Using white and an appropriately sized brush, click once on the canvas. Then select a soft standard airbrush and click once in the centre of the cross. Then select Edit/Transform to reduce the size of the sparkle as required. Move it to an edge or corner of your choice. Hold down the ALT key and move the sparkle elsewhere. This will duplicate the layer, and you can repeat this until have all you need. I chose to merge the new sparkle layers to prevent palette clutter by selecting them (using the shift key when clicking each one), clicking the layer palette submenu, and selecting Merge Layers.
![]()
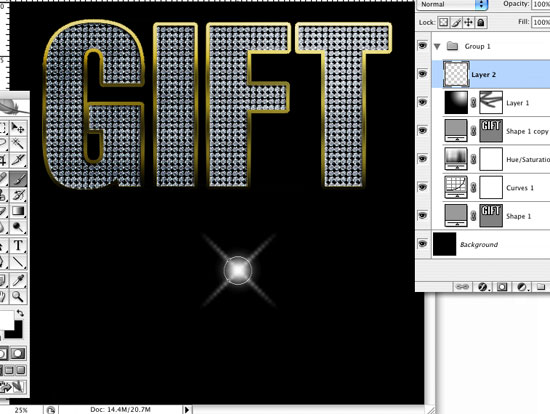
Photoshop Tutorial Bling Text
Create a reflection
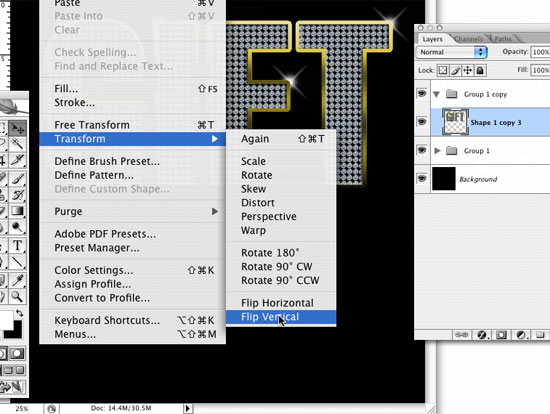
Finally we come to the reflection. Select all the layers (except the Background Layer) and from the layer palette submenu select New Group From Layers. Duplicate the group by dragging it over the Create A New Layer button. Expand the duplicate group and delete the sparkle layer and shadow layer. Select the remaining layers in the group and select Merge Layers.
Select Edit/Transform/Flip Vertical. Move the new layer downwards whilst holding down the SHIFT key (this constrains the movement to a single axis). Reduce the opacity of the layer to around 30% Then create a layer mask, a large, soft airbrush with 50% opacity, and erase the bottom half of the reflection, dragging left and right whist holding down the SHIFT key to constrain the movement.
![]()
Photoshop Tutorial Bling Text
Finished!
And there you have it! A great looking graphic created with very few layers, and all done non-destructively!
Resources & More Information
- Glassy Button Tutorial
- Photoshop Clipping Paths
- Free Method of Converting Quark to InDesign
- 4 Color Process Printing and Spot Color Printing - What's the Difference?
- Return from Photoshop Tutorial Bling Text to Home